SpringBoot的自动装配原理
springboot的自动装配原理可以配合springboot的启动原理一起学习。
springboot的自动装配原理和springboot的启动原理面试也属于高频题目。
本篇文章就来解决一下,这需要对springboot的源码有一定的了解。
# 什么是自动装配:
spring的核心在于IOC(控制反转对于spring框架来说,就是由spring来负责控制对象的生命周期和对象间的关系)和DI(依赖注入IoC的一个重点是在系统运行中,动态的向某个对象提供它所需要的其他对象。这一点是通过DI(Dependency Injection,依赖注入)来实现的。
比如对象A需要操作数据库,以前我们总是要在A中自己编写代码来获得一个Connection对象,有了 spring我们就只需要告诉spring,A中需要一个Connection,至于这个Connection怎么构造,何时构造,A不需要知道)。而这些框架在使用的过程中会需要配置大量的xml,或者需要做很多繁琐的配置。
而springboot的自动装配在spring的基础上,做了很多简洁的操作,进行了优化,SpringBoot 在启动时会扫描外部引用 jar 包中的META-INF/spring.factories文件,将文件中配置的类型信息加载到 Spring 容器,比如我们常见的就是.yml文件、.properties文件 都可以自动加载。
除此之外,如果你要引入第三方的jar,如果是starter的jar,比如:
<dependency>
	<groupId>org.springframework.boot</groupId>
	<artifactId>spring-boot-starter-data-redis</artifactId>
</dependency>
我们通过简单的配置,比如说@Configuration 或者在yml文件 就可以配置redis了,不再像spring那样在xml里面写一大堆的bean~
# SpringBoot 是如何实现自动装配的?
下面一起来看一下springboot的启动过程:
入口:
@SpringBootApplication
public class YudianxxSingleApplication {
    public static void main(String[] args) {
        new SpringApplication().run(YudianxxSingleApplication.class, args);
    }
}
# 1、initialize
private void initialize(Object[] sources) {
		if (sources != null && sources.length > 0) {
			this.sources.addAll(Arrays.asList(sources));
		}
  	 // 判断是否为WEB环境
		this.webEnvironment = deduceWebEnvironment();
    // 找到META-INF/spring.factories中ApplicationContextInitializer所有实现类,并将其实例化
		setInitializers((Collection) getSpringFactoriesInstances(
				ApplicationContextInitializer.class));
    // 找到META-INF/spring.factories中ApplicationListener所有实现类,并将其实例化
		setListeners((Collection) getSpringFactoriesInstances(ApplicationListener.class));
    // 获取当前main方法类对象,即我们启动类中的App实例
		this.mainApplicationClass = deduceMainApplicationClass();
	}
这个是初始化上下文的各种接口。
这里主要是ApplicationContextInitializer 和 ApplicationListener,并不像平时的Spring Components一样通过注解和扫包完成,而是通过一种不依赖Spring上下文的加载方法,这样才能在Spring完成启动前做各种配置。Spring的解决方法是以接口的全限定名作为key,实现类的全限定名作为value记录在项目的META-INF/spring.factories文件中,然后通过SpringFactoriesLoader工具类提供静态方法进行类加载并缓存下来。
# ApplicationContextInitializer
再看一下这个getSpringFactoriesInstances() 方法:
private <T> Collection<? extends T> getSpringFactoriesInstances(Class<T> type,
			Class<?>[] parameterTypes, Object... args) {
		ClassLoader classLoader = Thread.currentThread().getContextClassLoader();
		// // 读取META-INF/spring.factories指定接口的实现类
		Set<String> names = new LinkedHashSet<String>(
				SpringFactoriesLoader.loadFactoryNames(type, classLoader));
		List<T> instances = createSpringFactoriesInstances(type, parameterTypes,
				classLoader, args, names);
		AnnotationAwareOrderComparator.sort(instances);
		return instances;
	}

	@SuppressWarnings("unchecked")
	private <T> List<T> createSpringFactoriesInstances(Class<T> type,
			Class<?>[] parameterTypes, ClassLoader classLoader, Object[] args,
			Set<String> names) {
		List<T> instances = new ArrayList<T>(names.size());
		for (String name : names) {
			try {
				Class<?> instanceClass = ClassUtils.forName(name, classLoader);
				Assert.isAssignable(type, instanceClass);
				Constructor<?> constructor = instanceClass
						.getDeclaredConstructor(parameterTypes);
				T instance = (T) BeanUtils.instantiateClass(constructor, args);
				instances.add(instance);
			}
			catch (Throwable ex) {
				throw new IllegalArgumentException(
						"Cannot instantiate " + type + " : " + name, ex);
			}
		}
		return instances;
	}
这个是loadFactoryNames()方法:
public static List<String> loadFactoryNames(Class<?> factoryClass, ClassLoader classLoader) {
    String factoryClassName = factoryClass.getName();

    try {
        Enumeration<URL> urls = classLoader != null ? classLoader.getResources("META-INF/spring.factories") : ClassLoader.getSystemResources("META-INF/spring.factories");
        ArrayList result = new ArrayList();

        while(urls.hasMoreElements()) {
            URL url = (URL)urls.nextElement();
            Properties properties = PropertiesLoaderUtils.loadProperties(new UrlResource(url));
            String factoryClassNames = properties.getProperty(factoryClassName);
            result.addAll(Arrays.asList(StringUtils.commaDelimitedListToStringArray(factoryClassNames)));
        }

        return result;
    } catch (IOException var8) {
        throw new IllegalArgumentException("Unable to load [" + factoryClass.getName() + "] factories from location [" + "META-INF/spring.factories" + "]", var8);
    }
}
spring boot版本1.5.9.RELEASE 版本的 META-INF/spring.factories 内容:
# PropertySource Loaders
org.springframework.boot.env.PropertySourceLoader=\
org.springframework.boot.env.PropertiesPropertySourceLoader,\
org.springframework.boot.env.YamlPropertySourceLoader

# Run Listeners
org.springframework.boot.SpringApplicationRunListener=\
org.springframework.boot.context.event.EventPublishingRunListener

# Application Context Initializers
org.springframework.context.ApplicationContextInitializer=\
org.springframework.boot.context.ConfigurationWarningsApplicationContextInitializer,\
org.springframework.boot.context.ContextIdApplicationContextInitializer,\
org.springframework.boot.context.config.DelegatingApplicationContextInitializer,\
org.springframework.boot.context.embedded.ServerPortInfoApplicationContextInitializer

# Application Listeners
org.springframework.context.ApplicationListener=\
org.springframework.boot.ClearCachesApplicationListener,\
org.springframework.boot.builder.ParentContextCloserApplicationListener,\
org.springframework.boot.context.FileEncodingApplicationListener,\
org.springframework.boot.context.config.AnsiOutputApplicationListener,\
org.springframework.boot.context.config.ConfigFileApplicationListener,\
org.springframework.boot.context.config.DelegatingApplicationListener,\
org.springframework.boot.liquibase.LiquibaseServiceLocatorApplicationListener,\
org.springframework.boot.logging.ClasspathLoggingApplicationListener,\
org.springframework.boot.logging.LoggingApplicationListener

# Environment Post Processors
org.springframework.boot.env.EnvironmentPostProcessor=\
org.springframework.boot.cloud.CloudFoundryVcapEnvironmentPostProcessor,\
org.springframework.boot.env.SpringApplicationJsonEnvironmentPostProcessor

# Failure Analyzers
org.springframework.boot.diagnostics.FailureAnalyzer=\
org.springframework.boot.diagnostics.analyzer.BeanCurrentlyInCreationFailureAnalyzer,\
org.springframework.boot.diagnostics.analyzer.BeanNotOfRequiredTypeFailureAnalyzer,\
org.springframework.boot.diagnostics.analyzer.BindFailureAnalyzer,\
org.springframework.boot.diagnostics.analyzer.ConnectorStartFailureAnalyzer,\
org.springframework.boot.diagnostics.analyzer.NoUniqueBeanDefinitionFailureAnalyzer,\
org.springframework.boot.diagnostics.analyzer.PortInUseFailureAnalyzer,\
org.springframework.boot.diagnostics.analyzer.ValidationExceptionFailureAnalyzer

# FailureAnalysisReporters
org.springframework.boot.diagnostics.FailureAnalysisReporter=\
org.springframework.boot.diagnostics.LoggingFailureAnalysisReporter
这是一个k-v形式的文件,获取后就实例化它们。
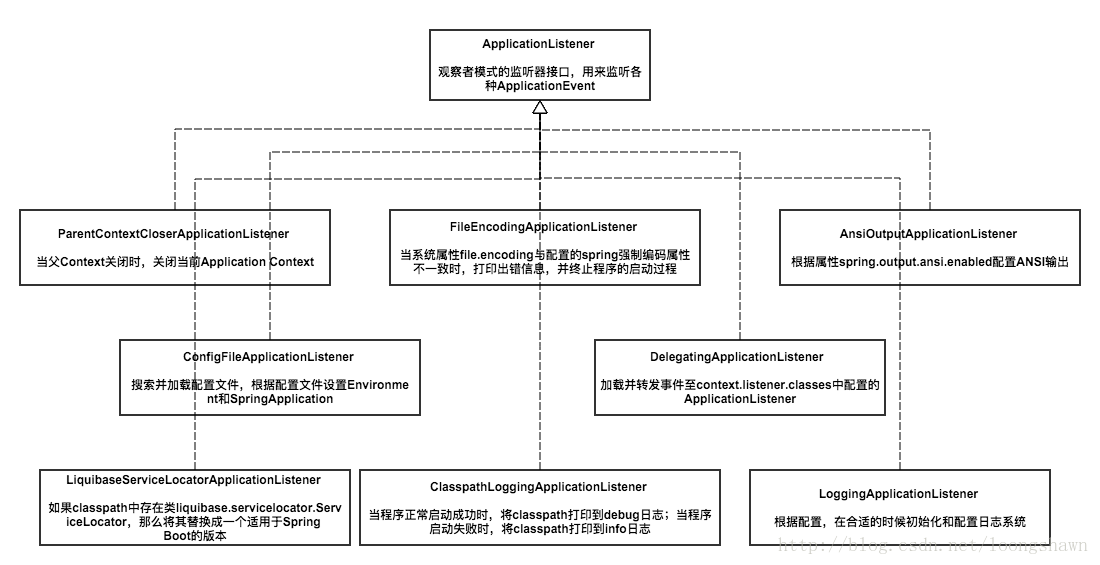
# ApplicationListener
ApplicationListener接口是Spring框架的事件监听器,其作用可理解为SpringApplicationRunListener发布通知事件时,由ApplicationListener负责接收。SpringApplicationRunListener接口的实现类就是EventPublishingRunListener,其在SpringBoot启动过程中,负责注册ApplicationListener监听器,在不同时间节点发布不同事件类型,如果有ApplicationListener实现类监听了该事件,则接收处理。
# 2、SpringApplication.run()
SpringApplication.run() 是springboot程序的入口,这个在 springboot的jar为什么可以直接运行这篇文章提到,但是这个只是入口,并不是自动装配。
所以面试问你 springboot的自动装备原理 的时候,不要一上来就说@SpringBootApplication注解是一个复合注解,包括了另外三个注解。巴拉巴拉一大堆,其实首先要知道,spring 是先启动了容器,才到扫描@SpringBootApplication注解。
进入这个方法看一下,顺便理清springboot的启动过程:
public ConfigurableApplicationContext run(String... args) {
		StopWatch stopWatch = new StopWatch();
		stopWatch.start();
		ConfigurableApplicationContext context = null;
		FailureAnalyzers analyzers = null;
		configureHeadlessProperty();
    // 启动SpringApplicationRunListener监听器
		SpringApplicationRunListeners listeners = getRunListeners(args);
		listeners.starting();
		try {
			ApplicationArguments applicationArguments = new DefaultApplicationArguments(
					args);
			ConfigurableEnvironment environment = prepareEnvironment(listeners,
					applicationArguments);
			Banner printedBanner = printBanner(environment);
            // 创建ApplicationContext 容器, 有点像spring吧~
			context = createApplicationContext();
			analyzers = new FailureAnalyzers(context);
            //创建容器前的一些操作
			prepareContext(context, environment, listeners, applicationArguments,
					printedBanner);
            //刷新容器
			refreshContext(context);
			afterRefresh(context, applicationArguments);
			listeners.finished(context, null);
			stopWatch.stop();
			if (this.logStartupInfo) {
				new StartupInfoLogger(this.mainApplicationClass)
						.logStarted(getApplicationLog(), stopWatch);
			}
			return context;
		}
		catch (Throwable ex) {
			handleRunFailure(context, listeners, analyzers, ex);
			throw new IllegalStateException(ex);
		}
	}
这个过程很多东西,准备Environment——发布事件——创建上下文、bean——刷新上下文——结束,其中穿插了很多监听器的动作,并且很多逻辑都是靠各种监听器的实现类执行的, 这就是上面说到的ApplicationListener (看上面图片),简单的说:run方法要启动,还得通过这些监听器。
重点来看看prepareContext()方法,这个方法是
private void prepareContext(ConfigurableApplicationContext context,
			ConfigurableEnvironment environment, SpringApplicationRunListeners listeners,
			ApplicationArguments applicationArguments, Banner printedBanner) {
		context.setEnvironment(environment);
		postProcessApplicationContext(context);
		applyInitializers(context);
		listeners.contextPrepared(context);
		if (this.logStartupInfo) {
			logStartupInfo(context.getParent() == null);
			logStartupProfileInfo(context);
		}

		// Add boot specific singleton beans
		context.getBeanFactory().registerSingleton("springApplicationArguments",
				applicationArguments);
		if (printedBanner != null) {
			context.getBeanFactory().registerSingleton("springBootBanner", printedBanner);
		}

		// Load the sources
    	// 这里加载出来的就是启动类的注解,这里开始加载注解
		Set<Object> sources = getSources();
		Assert.notEmpty(sources, "Sources must not be empty");
		load(context, sources.toArray(new Object[sources.size()]));
		listeners.contextLoaded(context);
	}
run()方法中,通过调用自己的prepareContext()方法,在prepareContext()方法中又调用getAllSources()方法,然后去获取启动类,然后通过SpringApplication的load()方法,去加载启动类,然后在刷新容器的时候就会去将启动类在容器中进行实例化。
此后通过SpringApplication的refreshContext(context)方法完成最后一道工序将启动类上的注解配置,刷新到当前运行的容器环境中。
# @SpringBootApplication
千呼万唤始出来。
接下来就是这个@SpringBootApplication注解包含的三大注解了:
@Target(ElementType.TYPE)
@Retention(RetentionPolicy.RUNTIME)
@Documented
@Inherited
@SpringBootConfiguration
@EnableAutoConfiguration
@ComponentScan(excludeFilters = {
		@Filter(type = FilterType.CUSTOM, classes = TypeExcludeFilter.class),
		@Filter(type = FilterType.CUSTOM, classes = AutoConfigurationExcludeFilter.class) })
public @interface SpringBootApplication {
# @SpringBootConfiguration
@SpringBootConfiguration这个注解说明再点进去查看详情发现就是一个@Configuration注解,这说明启动类就是一个配置类。支持Spring以JavaConfig的形式启动。
# @ComponentScan
这个注解,从字面的意思上也能看出来,就是组件扫描的意思,即默认扫描当前package以及其子包下面的spring的注解,例如:@Controller、@Service、@Component等等注解。
# @EnableAutoConfiguration
@EnableAutoConfiguration这个注解也是一个复合注解:
@Target(ElementType.TYPE)
@Retention(RetentionPolicy.RUNTIME)
@Documented
@Inherited
@AutoConfigurationPackage
@Import(EnableAutoConfigurationImportSelector.class)
public @interface EnableAutoConfiguration {
这个注解是比较核心的一个注解,springboot的主要自动配置原理基本上都来自@EnableAutoConfiguration这个注解的配置,那么我们通过看这个注解的源码可以发现有两个注解比较重要的。
- 一个是
@AutoConfigurationPackage,自动配置包。 - 另一个是
@Import(AutoConfigurationImportSelector.class),自动引入组件。
@EnableAutoConfiguration 只是一个简单地注解,自动装配核心功能的实现实际是通过 AutoConfigurationImportSelector类。
这个
AutoConfigurationImportSelector才是加载自动装配类
@Deprecated
public class EnableAutoConfigurationImportSelector
		extends AutoConfigurationImportSelector {

	@Override
	protected boolean isEnabled(AnnotationMetadata metadata) {
		if (getClass().equals(EnableAutoConfigurationImportSelector.class)) {
            //获取所有需要装配的bean
			return getEnvironment().getProperty(
					EnableAutoConfiguration.ENABLED_OVERRIDE_PROPERTY, Boolean.class,
					true);
		}
		return true;
	}

}
主要用于获取所有符合条件的类的全限定类名,这些类需要被加载到 IoC 容器中
不光是这个依赖下的META-INF/spring.factories被读取到,所有 Spring Boot Starter 下的META-INF/spring.factories都会被读取到。
重点看一下:AutoConfigurationImportSelector类:

但不是所有配置都会读取,下面有几个过滤的方法,简单的说就是 @ConditionalOnXXX 中的所有条件都满足,该类才会生效。
所以面试的时候,一定要注意,并不是所有的META-INF/spring.factories都会被加载和读取。
# 总结
Spring Boot 通过@EnableAutoConfiguration开启自动装配,通过 SpringFactoriesLoader 最终加载META-INF/spring.factories中的自动配置类实现自动装配,自动配置类其实就是通过@Conditional按需加载的配置类